Csena[HUN]
SKC Elite Member
 
Joined: 30 Jul 2009
Posts: 1056
Location: Hungary
|
 Posted: 04 Jan 2012, 08:35 Post subject: IRC Tutorial Posted: 04 Jan 2012, 08:35 Post subject: IRC Tutorial |
|
|
IRC Clients
While there are a variety of IRC clients available, the focus of this tutorial will be the use of , a Windows based IRC client. There are many different clients available, some of the more popular ones include BitchX, XChat, Trillian, BeserIRC, Klient, ChatZilla (found in Mozilla Web Browser), and even the Opera Web Browser has IRC support in v7.50+.
Using mIRC
Settings
The first thing to do is obviously to . At the writing of this tutorial, the current version of mIRC is 7.22.
After downloading mIRC, the next set would be to install it. It's a simple process.
Now that you've gotten mIRC downloaded and installed, its time to start up mIRC, and get it set up so you can connect to the network we use, as well as the channel.
The first thing you will see when you start up mIRC, is the mIRC Options page.
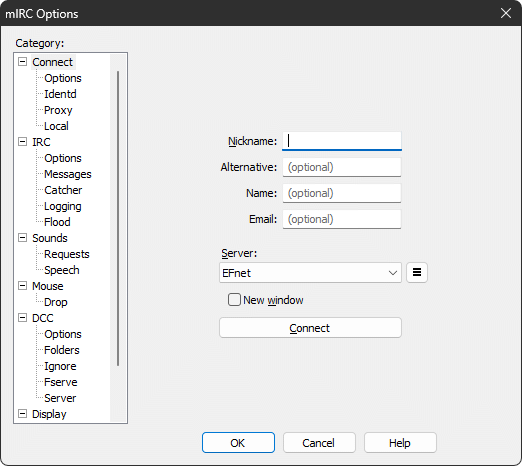
Fill in the Full Name, using anything you want. You can use your real name, your forum name, ingame name or whatever.
Below that is your Email Address. You need to enter something, and it needs to be in the format of an email address. What you use is up to you.
Below that is Nickname, enter in here what you want to be known as in the IRC Channel. Best thing to do here is to use your forum or ingame nick for both. This also helps so people know who you are.
The Alternative blank below that will be what your nick will be should someone else be using your name. - Don't worry, I'll show you how to register your nickname, so only you can use it.
Now, let's get you connected to the GTANet. But first, we need to add the server into the server list. First thing to do is still inside the mIRC Options screen is to click on the Servers Option

You should see an Add button, under the IRC Server drop down menu. Click the Add button to bring up the add server screen.

Enter the following information:
Description: GTA.Net
Server: irc.gtanet.com
Port(s): 6667
Click Add. The server is added to the server list, and is brought up when you return to the mIRC Options. To connect to the server now, click “Connect To Server”.
The mIRC Options will disappear, and mIRC will attempt to connect to the IRC Network. Once it has connected, a “favorites” list will appear. Uncheck the box at the bottom that says “Pop up favorites on connect, and then click ok to close the window.

You should now be looking at the main mIRC window again. You should see the “Message of the Day” (MOTD), server stats, your host name, and other relevant information.

Join SKC channels:
Now, we'll join the SKC main channel. To do this, type:
/join #skc. Also you can use the /list command to see a list of channels on the network.
Congratulations, you are now inside the SKC IRC Channel. You're now free to chat, or do whatever. That is of course, as long as you follow the channel and server rules.
If you want to join race, dd or dm channels type these:
/join #skc-race
/join #skc-dd
/join #skc-dm
You can add these channels to your favourites.
Registering a Nickname:
The registration process is fairly simple. To do this, type:
/msg NickServ REGISTER password e-mail
To log in, type:
/msg NickServ IDENTIFY password
Available commands:
"!s Hai" if you want say Hai for ingame players.
Important notes!!!
Spamming will not be tolerated and I also would like to mention if you get muted on the server you are not allowed to complain from IRC. You can easily get perm ban.
Last edited by Csena[HUN] on 30 Jan 2013, 09:28, edited 1 time in total.
|
|